
목록AWS (50)
클라우드 엔지니어 꿈나무
 eks resource 생성 실패 시, no task 오류 해결
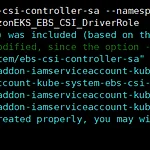
하기와 같이 리소스 생성 중 에러 발생 service account 생성이 실패한 것을 확인할 수 있다. 생성이 실패하였으나 다음과 같이 시도하면 서비스 어카운트가 있다고 출력된다. AWS 콘솔로 이동 하기와 같이 해당 리소스가 생성되어 있으며 이벤트 탭을 들어가면 어느 부분에서 오류가 떴는지 확인이 가능하다. 나의 경우, 역할 이름이 중복되어 생성이 불가하였으나 이미 스택이 생성된 상태라 서비스 어카운트가 생성되었다는 오류값이 출력된 것. 해당 스택 삭제 service account resource 재생성 시도하였으며 성공한 것을 확인할 수 있다.
 eksctl 명령어 입력시 권한 오류
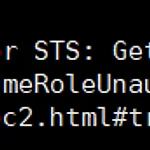
eksctl 실행 시, 하기와 같은 오류 발생 나의 경우 보안을 위하여 profile을 추가로 설정하여 aws configure 를 설정하였다. 이로 인해 위와 같은 문제 발생 -- procile 없이 aws configure 추가적으로 실행 편안-☆
 EKS 클러스터 접근 가능한 사용자 추가
클러스터 생성한 사용자가 아니면 같은 계정에, 관리자 권한이 있더라도 클러스터 노드 조회가 불가능 때문에 클러스터 생성 후, terraform이 아닌 kubectl 로 클러스터 접근 가능한 사용자를 추가하고자 함 권한이 없어 하기와 같이 조회 불가 kubectl edit -n kube-system configmap/aws-auth 로 config amp 파일 수정 apiVersion: v1 data: mapAccounts: | - "" mapRoles: | - "groups": - "system:bootstrappers" - "system:nodes" "rolearn": "arn:aws:iam:::role/initial-eks-node-group-20240102025335329100000003" "use..
 AWS Cloudfront 사용하여 route53과 연결하기
CloudFront :AWS 백본 네트워크를 통해 콘텐츠를 가장 효과적으로 서비스할 수 있는 엣지로 각 사용자 요청을 라우팅하여 콘텐츠 배포 속도를 향상시킴 Cloudfront에 연결하기 위하여 Virginia 북부에 하기와 같이 인증서 생성 원본 도메인 내, 생성한 로드밸런서 선택 기본 캐시 동작 내, 캐시 키 및 원본 요청 캐시 정책 - CachingDisabled 원본 요청 - AllViewer Caching Disabled를 체크하지 않으면 변경 사항이 바로 적용이 되지 않고 시간이 걸리기 때문에 Caching Disabled로 체크 추후, 캐시를 사용할 경우에는 CachingOptimized 선택 보안을 위하여 WAF 추가 생성 추후 SQL 로 RDS 를 생성할 예정이므로 SQL protecti..
 EKS autoscaling 생성 w/helm
EKS version : 1.24 Kubernets version: 1.23.6 helm version: 3.8.2 이전에 적용했던 yaml 파일 되돌리고 실행하기 kubectl apply -f . 모니터링을 위하여 metric server 설치 kubectl apply -f https://github.com/kubernetes-sigs/metrics-server/releases/latest/download/components.yaml 설치 확인 Charts.yaml apiVersion: v2 name: game2048 description: A Helm chart for Kubernetes # A chart can be either an 'application' or a 'library' chart. ..
 Load Balancer를 사용하여 도메인 연결
awscli 설치 apt update -y apt install -y awscli 인스턴스 이미지 : ami-0454bb2fefc7de534 aws configure 로 aws와 연결 aws configure kubernetes 설치 * bastion cli 및 aws console 쿠버네티스 1.27로 버전 맞추었으나 오류 발생 * aws console 1.27으로 유지, bastion 은 1.23.6 으로 설치 후, 정상 가동 aws 측에서는 버전은 위 아래 1까지 적용 가능하다고 했으나 1.27에서 1.27 가동 불가, 1.26 가동 불가 1.23.6으로 설치 후, 가동 쿠버네티스 다운로드 curl -LO "https://storage.googleapis.com/kubernetes-release/r..
 AWS OPENVPN 설치
인스턴스 설정 OPENVPN 이미지 OPENVPN 보안 그룹은 인스턴스와 같이 생성 해당 이미지는 보안 그룹에 하기의 포트들이 초기 값으로 같이 지정되어 있다. 소스는 내 IP Private 인스턴스 보안 그룹은 SSH 에 OPENVPN 보안 그룹만 접근 가능하게 허용 Xshell 에서 하기와 같이 입력 후, OPENVPN 인스턴스 접근 약관 동의하면 하기와 같인 창이 출력된다. Admin UI로 접속 위의 창에서 출력된 계정 정보 입력 Private 인스턴스에서 접근할 수 있도록 user 추가 Client URL 로 접근하여 추가한 계정으로 로그인 해당하는 OS 선택하여 설치 하기와 같이 퍼블릭 IP 입력 후, private 계정으로 연결 연결 성공 표시 Xshell 로 하기와 같이 로그인 Privat..
 AWS ECR 생성 및 레포지토리에 이미지 업로드
ECR 부분은 한국어 지원이 안되나 보다. 레포지스토리는 frontend 용과 backend 용 2개 생성 하기와 같은 방식으로 kang-backend 생성 Cloud9 생성 (Cloud9은 기본적으로 도커와 깃이 설치되어 있다.) Cloud9 으로 생성되는 인스턴스에 퍼블릭IP가 부여되지 않으면 Cloud9 사용이 불가하므로 자동으로 IP 할당되게 서브넷에서 설정 (Cloud9 은 모든 가용 용역에서 기본 서브넷 사용) 나의 경우, 현재 가용 용역을 2개 만들었기 떄문에 각각의 가용 용역의 public subnet 부분에 하기 설정 활성화 AWS Cloud9 > 환경 > 환경 생성 새로운 EC2 인스턴스 : t2.micro 네트워크 설정 > 연결 : AWS Systems Manager(SSM) git ..
 AWS OpenVPN 으로 로그인
EC2 생성 VPC 및 서브넷은 생성된 VPC와 인터넷게이트웨이를 연결한 퍼블릿 서브넷으로 설정 키페어는 기존 생성, 퍼블릭 IP 할당 하기 설정 이후에는 기본 값으로 진행 EC2의 이미지는 openvpn 검색 후, 가장 상단에 있는 것으로 진행 보안 그룹 Xshell 접속 사용자 이름 openvpnas 로 초기 설정되어 있음 최초 로그인 시, 동의 관련하여 yes 타이핑 후, 다음 것들은 초기값으로 진행 하기와 같이 로그인 관련한 정보 출력 openvpn connect 연결 후, 인터넷 창에서 위에 출력된 아이디와 비밀번호로 로그인 동의 화면 클릭 후, 하기와 같은 화면이 출력 User 생성 IP 로 접속 생성한 유저로 로그인 설치 화면 출력 윈도우 사용 중이므로 윈도우로 진행 다운로드 완료되면 설치 ..
 AWS 인프라 구축 2 : RDS, S3 버킷, DNS
이전 글 https://hiheey.tistory.com/150 RDS 생성 파라미터 그룹 옵션 그룹 서브넷 그룹 private 에 연결 데이터베이스 생성 엔진 유형 : MYSQL 템플릿 : 프리티어 인스턴스 구성 : db.t2.micro 보안그룹 : default 가용 용역 : 설정 없음 데이터베이스 인증 : 암호 인증 web01 과 web02에 mysql 설치 $ sudo yum install -y mysql 엔드포인트로 CMD 연결 web01 및 web02 데이터베이스 연결 확인 $ mysqladmin ping -u admin -p -h [엔드포인트 주소] 스토리지 S3 모든 퍼블릭 엑세스 차단으로 지정하고 생성 IAM 역할 생성 EC2에 S3 버킷에 접근할 수 있도록 역할을 생성하여 적용 IAM ..